Support Crowdrender!
Documentation - v0.2.x

INSTALLING
Everything you need to know about installing the addon

CONNECTING TO NODES
How to enable the addon, configure and connect to other computers

EDITING
How to edit scenes when using crowdrender

TROUBLESHOOTING
Tips on what to do when things go wrong

CLOUD SETUP
How to setup your cloud account and get more power!

RENDERING
How to render with crowdrender

SUPPORT
How to get help

RELEASE NOTES
See what changed in this release
INSTALLING

System requirements
Our current system supports Blender 2.78, 2.79a and 2.79b. Daily builds of 2.79 will also work. As a result you should make sure your systems meet the minimum requirements for running these versions of Blender. For example, you can't mix daily builds and 2.79 official releases as attempting to connect from one to the other will result in a failure to sync properly.
Also, v0.1.7 is not compatible with any previous release, so please make sure you install v017 on all machines.
Download and install
Crowdrender is currently downloaded as a zip file which can then be installed into blender using the "install from file" button inside blender's user preferences as shown in the image below. You will also need Blender which you can get from www.blender.org if you don't already have it.

If you already have a copy of crowdrender installed then you will need to remove the existing copy first. Though there is an option in blender to "overwrite" the addon with a newer install, we've noticed on a few occasions that the addon doesn't get overwritten. So best practice is to remove it completely before installing the latest version.
On windows you can't remove the addon until you have disabled it. You'll need to save your user preferences ("Save User Settings" button in the image above) with the addon disabled, then restart blender. Once restarted, open the user preferences again and you will be able to remove the addon and install the new one.
You can view a video below that covers the entire installation process for both Mac and windows (linux works much the same as for mac and so is not covered).
Enabling
With the addon installed, the next thing to do is to enable the addon. To do this, go to User Preferences -> addons and search for Crowdrender. You should see something like the screen below. Then check the check box and head to the next step below, "Starting" (you'll need to repeat this process of install, enable, start on each computer you want to use).

Please note that some windows platforms may give an error when enabling the addon for the first time. You may see an error which contains the following text (most likely at the end of the error text):
File "C:\Users\James\AppData\Roaming\Blender Foundation\Blender\2.79\scripts\addons\crowdrender\lib\Win64\zmq\backend\cython\__init__.py", line 6, in <module> from . import (constants, error, message, context, ImportError: DLL load failed: The specified module could not be found.
or you may get this error instead;
ImportError: CrowdRender is not able to run because it can't import necessary
components, please e-mail us at [email protected] to report this
If you encounter this error, don't panic! There is an easy fix for it. This error occurs due to your windows installation not having the most up to date files. This is easily fixed by downloading and installing a windows update, the link for which is here -> https://www.microsoft.com/en-US/download/details.aspx?id=48145
Once you've installed the update, you can simply try to enable the addon again.
Starting
Starting is a new concept for CrowdRender. In previous versions, the addon would work from the moment it was enabled. With version 2.8 of Blender set for release this year and the changes to how addons work with it, we had to make some changes so our addon will still work when Blender 2.8 is released.
So, to get CrowdRender to start, after enabling it, you need to press the big, 'in your face' start button as seen below.

Once the system starts you will see a few notifications in the info bar indicating that the system is starting like the one below.

You should also see the crowdrender panel available in the render settings which will look something like this. Bear in mind that the crowdrender panel is usually at the bottom of the stack of render settings, here its shown at the top as we've moved it. If you don't see the panel at first, make sure you scroll down.

CLOUD SETUP
CLOUD SETUP

Setting up your account
The cloud platform in v017 allows you to add powerful servers from the cloud to your own hardware, thanks to Blender Grid who are partners with us in providing access to the AWS EC2 system.
IMPORTANT! Currently the cloud uses AWS EC2 spot instances. This allows us to offer you a very reasonable rate, but, in its current state, there is a risk that a cloud node may be pre-rempted, meaning you will loose connection to it, and it will stop rendering. Currently our load balancer will halt your animation render if this happens so we recommend you use the cloud only where you are supervising the render. A new node will be started to replace any you loose and you can connect to the new node and continue rendering once it is synchronised.
To use the cloud platform you need to create an account, which is 100% free, you can register and setup your account by simply visiting this link;
Once you've logged in, you'll see the home page as you can see below, just head to "setup guide" which will help you get your account setup.

Inside setup you'll see a neat list of steps you need to take to get your account ready to use.
-
Download v017 (if you haven't already)
-
Set a password for logging in via the addon
-
Install the addon and add credit (credit is required if you want to use AWS Servers)
-
If you have a BlenderGrid account, you'll need to connect your account if you'd like to use your Blender Grid credit balance with CrowdRender.
Logging in your computers
To use your account, you'll need to login from at least the main computer you work from. If you'd like to use the autodetect nodes feature, you'll need to log each node into your account that you'd like to appear in your list whenever it is available to connect to. This section shows you how to do that.

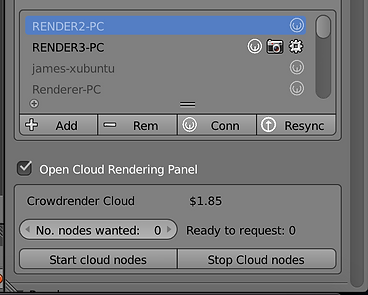
Make sure you tick the "Open Cloud Rendering Panel" to show the user name and password fields. Enter you username and password into the boxes provided as shown highlighted above (your user name will be the e-mail you see in your cloud account profile page and the password you set in the "setup" page, see above).
Each computer you have logged into your account will appear in your list of render nodes. When a computer is displayed in bold with the connect symbol, camera and cog icons, it means its online and ready to connect. Check out the new crowdrender interface in Blender below.

As you can see above, bold indicates the computer is ready to connect, greyed out means the computer is either not logged in or is not running blender and crowdrender. If you choose not to log in a computer, it will be greyed out, but, you can still connect to it.
We've kept the same method for connecting by using the host name of the computer from previous versions, see the section on connecting to nodes for how to connect with and without an account.
Get the most from using cloud nodes
We've partnered with Blender Grid to bring you access to fast cloud servers, these servers have Xeon CPUs with 36 threads and 60GB of RAM. You can add as many of these as you like to scale up your render power when you need it. Each node you add works with your own computers to make the whole job run faster.
To get the most from these fast computers, we've put together a few tips for you, check the section below.
Use the right blender version
Our system currently runs Blender 2.79b, which means you'll need to be running either 2.79a or 2.79b to be able to use the system. Please make sure you use either of these two versions on your master computer (where you connect from) so that you can successfully synchronise your system with the cloud.
Storage is not (yet) persistent for your files in the cloud
When you upload your project file to a cloud node/s, the storage for your data is not persistent, if you stop using the system and start using it later you will need to upload your project again. We're working on making storage persistent, stay tuned for updates.
We do, however, make sure you data is secure, all data uploads and downloads when using the cloud are secured by encryption. All login requests from the addon use https as well as the website that hosts your account.
Remember to account for time spent downloading results
For the best results, keep in mind that once your render time per frame becomes less than 30 seconds, the time taken to download the resulting image tiles can start to dominate the length of render times for each frame.
Our experiments with the Blender BMW benchmark shows that with a fast internet connection of approximately 500 mb/s, having more than 5 server nodes at once may not be beneficial unless you start to increase the resolution and/or sample count. As a general rule of thumb, you add servers until the render time isn't dropping significantly. If you then scale up resolution or samples, you can then add more nodes to compensate.
Remember we use spot instances
One more important thing to bear in mind, the system makes use of pre-emptable servers which may be shutdown with little warning. When this happens you will be allocated a new node immediately which will appear within one to five minutes (maximum). Please bear this in mind when planning to use the system since our current addon will not automatically connect and continue rendering, we are working on upgrading the addon to do this so that a running render job will continue uninterrupted even is a node has to be replaced
Credit and billing
Our system is credit based which means you add credit to your account which is then used when you request cloud nodes, please be aware that you need a minimum balance of $2.00 to start a render node.
Credit is consumed at a rate that scales with how much you use the CPU. If you are rendering and using 100% of the CPU, then credit is consumed at the maximum rate possible for that node. If the node has an idle CPU, then the rate of credit used is reduced.
You can add credit on your profile page in your cloud account, as you can see from the screenshot below. Just head to https://discovery.crowd-render.com/profile

When you request a node to use with your scene, billing starts once the node has been allocated to you. It typically takes between a few seconds to a minute for this to happen, depending on how busy the system is.
Billing stops once you press "Stop Requesting Nodes". You can expect to see the cloud nodes remain active for up to two minutes afterwards, but they may be shutdown much sooner. Be cautious of using them once you've requested them to stop as they may not return any results to you if they shutdown whilst you are still using them, and this may stall your render.
Requesting nodes and connecting
To request one or more nodes, first, select the number you want in the "No. nodes wanted:" box. Then, when you are ready to start the nodes, press the button "Start Cloud Nodes".
It can take up to two minutes to until you will see the node appear in your crowdrender panel. When it does you will likely first see "Starting server node 1". Once you see this, the node should be ready to connect in less than a minute.
The addon will warn you about the delay the first time you start requesting nodes. You can choose to permanently dismiss this notification as shown in the image below.

When the node is ready to connect you'll see its name change from "Starting server node 1" to its unique identifying number. This number is a just a unique id assigned to that particular node. Each time you request a new server node you get a different id. In the screenshot below you can see a new cloud node ready to connect. The number "7a28b459c029" has been assigned to this particular node.

CONNECTING TO NODES

Connecting (without a cloud account)
This section will cover connecting to your own hardware first and then we'll cover using the cloud a little later (see further down for connecting to cloud nodes).
First, make sure you have at least two computers on the same network, running blender and with the addon enabled. Next, go to the crowdrender panel, and add a node using the " + Add" button. You should see a new node appear as in the picture below. By default the new node will have the name "new node".

We recommend renaming the node. If you know the node's computer name or host name, use this name and replace the default "new node". This will allow Crowdrender to query your network and automatically discovery the node's address on the network, allowing you to easily connect to it.
If you're not sure how to find out what the host name is for each of your render nodes, don't panic! We've got some resources for you in our article that should help :).
You should make sure the node you're connecting to is on, running blender with the addon enabled and 'started' (see above). Also, check that the node you are connecting to is running the same version of crowdrender. You can check this by looking at the node in the crowdrender panel. If you see an exclamation mark like in the image below, then you are using two different versions of crowdrender on the client and node with the exclamation next to it.
Connect to this node only
Connect to all nodes in the list

You can also click on the exclamation mark to reveal what versions of crowdrender the node is using, just like in the image below.
This can help in making each node compatible. Bear in mind, you can still try to connect to a node if it is displaying this warning, but you may get unexpected results.

Once you've entered the host name or computer name, click the node's connect button or the connect all button.
You'll see a panel open with the host name or computer name of your node and the node's address on the network. If Crowdrender can't find the node's network address, then the "ip address" box will be blank. If this happens you can simply enter the node's network address manually if you know it.
If you need to find the ip address of any of your computers, there are some resources here if you need them, just click here!.
To connect, just press "OK" and Crowdrender will begin connecting to the node.

You should see the status of the node change from being blank, to "ready", then to "syncing", "uploading" and finally "synced". Obviously, large blend files will slow down the upload stage. You can connect to other nodes whilst uploading is going on. Each node will connect and sync independently.

Connect all nodes
If you have a lot of nodes in your list, you can attempt to connect to all of them. You can do this by pressing 'connect all' which is highlighted below.
Connect to this node only
Connect to all nodes in the list
Once you have pressed connect all, Crowdrender will try to connect to all the nodes in the list, even ones which are greyed out. This may take a few seconds before you see a panel appear with all your nodes divided into two groups. The first group is nodes for which no network address can be found, unless you manually enter an address, they will not connect. The second group, "nodes ready to connect" contains all nodes which will connect. Pressing OK will begin the connection to all nodes which have a network address (this is labelled as "ip address" below).

You will see the nodes connecting and uploading the blend file and finally becoming synced.
Connecting to nodes with a cloud account
This section will cover connecting to your own local computers and to cloud nodes when you are logged into your cloud account (to see how this is setup, check out this section of the documentation)
Connecting with a cloud account works pretty much exactly the same. The nice thing about having a cloud account is that each node you have running that is logged into your account is automatically detected and appears in your render node list. You can tell which nodes are online and available to use just by looking.

In the image above you can see that there are three active nodes, available for a connection. This is why they are in bold and have the camera and cog icons visible as explained in the setup guide for the cloud.
To connect to any node, just press its connect symbol. You can also press "Conn" to attempt to connect all nodes. This works the same for the cloud nodes or for your own computers.
If connections fail what to do
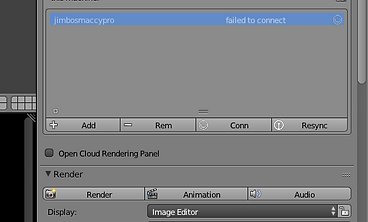
When you try to connect to a node, CrowdRender will try to contact the node to start a session. It will do so for 30 seconds then give up. This is the default amount of time the addon will wait until displaying a notification that the connection failed.
As you can see in the screenshot above, the addon will show the node "failed to connect" if it could not establish a connection. This can happen for a lot of reasons, some of them can be quite simple, such as forgetting to switch the node on or start blender, or the addon. Some are more tricky to solve. We have a section on troubleshooting and if you are still stuck you can always get help.
So, what to do where there is trouble connecting when it seems you should be able to? In some cases, simply trying again can work. If you are on a congested network or have a high latency internet connection, its possible the request to connect was late or its response was or both. If this doesn't work, try looking at the troubleshooting section.
RENDERING

How to Render :)
Rendering is actually quite straight forward. Once you have at least one render node in the "synced" state, you can press the "Render still" button on the crowdrender panel or "Animation" and crowdrender will render the scene on all your computers which are enabled to render.
Before moving on to rendering, lets take a quick look at the rendering controls.

Your local computer
Opens node properties
enable or disable this node from rendering
Renders a still
Renders an animation
Crowdrender does not work with F12 or the rendering options in Blender's "Render" menu. To render, you can use the two buttons located on the panel near the top as shown above.
By default, Crowdrender will use your local computer (the one you are working from, see above) to render. By clicking the camera icon for your local computer, you can disable it from rendering and just use the render nodes you have connected to. You can in fact disable any node from rendering by clicking the camera icon next to it. It will be greyed out when disabled.
Feedback during the render
During the render, the crowdrender panel will show the progress of each individual machine's render tile. The progress bar shown at the top of the screen (which is displayed during normal blender renders as well) is updated as the average of the individual machines. The stats of each machine are also displayed throughout the render, all this can be seen in the image below.

How the load balancer optimises your render
Ok, lets be honest here, the first time you render a scene with CrowdRender it can actually be slower than using a single machine. This sounds a bit ridiculous, but the reason behind it is that our load balancer needs data from previous renders so it can optimise how much of the date each computer renders.
As you do more renders it uses the data from each one to give each machine just the right amount of work to do so each node finishes at the same time and the render time is minimised as much as possible.

Opens load balancer properties
Because of this limitation, v017 introduced manual adjustment of the load balancer. By opening the load balancer properties panel (see image above), you can see the proportion of screen area assigned to each render node, and you can adjust this your self by checking the "Manual load balancing" check box.
With the check box checked, you can set what ever screen areas you like. Though bear in mind, the addon will only permit values that add to 1.0 since otherwise you might render less than the total image. You will see that the addon will automatically adjust the values for you to maintain a total of 1.0.
As long as manual load balancing is selected, the addon will use the values you provide. You can of course switch back to automatic at any time. The data from rendering in manual mode is used to help the automatic load balancer better predict the right amount of the image to give to each render node.

Render tile override
Opens node properties
Custom Render Tile Sizes
You can set custom render tile sizes for each node. This is particularly useful where you have a mix of GPU and CPU devices that will render. You can override the render tile size to give each device an optimum tile size.
The default values are 0, which means no override, the render will use the render tile size set in Blender's render settings.
Using GPUs
Select device type
Opens node properties
You can now easily choose whether to render on GPU or CPU. Just open the node properties for the node you want to choose the render device for. Then simply choose the device type. The properties panel will then show all devices for that type which are installed. You can then check which devices you want to use.
Don't forget, you may wish to change the render tile override, especially where you are mixing CPU and GPU devices.
EDITING

Some changes you make can be update to each node instantly. This saves you time, not having to upload your whole project to your render farm, each time you make a slight change.
Currently, as of the v017 release the following kinds of edits are supported in real time. These are:
-
Changes to object transforms, rotate, scale and move
-
Changes to shader settings, you can edit values of existing nodes (sadly making new nodes or editing connections between them is a future feature)
-
Changes to your render settings
This set of edits has been chosen to allow you to tweak things just prior to finalising your render. We focussed on composition, shading and rendering over modelling, texturing and animating.
How to use real time updates
Simply edit your scene as desired, the updates are automatically handled by CrowdRender. You can check the status of your render nodes as you edit to make sure each computer is still "synced".
Its also important to know a little about how our system works to use it well whilst editing. If you make edits that are not supported, one of two things will happen.
-
If the edit is to data Crowdrender is capable of tracking, but can't sync, then render nodes will have a status of "sync failed".
-
If the edit is to data Crowdrender doesn't currently track, then nodes will remain "synced", but you will probably see errors in your render.
If either of these situations occurs you will need to perform a resynchronisation or "resync" for short.
Resync's just this node

Resync's all nodes
Resynchronising
If all nodes need to be resynchronised, then you can simply press the "Resync" button as shown above. This will force each render node to remove its copy of your project and replace it with a copy of the one on your local computer (where you are working from). This can take a long time if your project is large.
If only one node is affected, you can open its node properties panel (by pressing the cog icon next to it). As shown above, there is an option to only resync that particular node, which will save time uploading since only that render node will attempt to download your project.
Fixes for persistent "sync failures"

Occasionally, you might find that even after resynchronising, your render nodes will not be synced. If this happens there are a couple of things to try.
First, save your blend file. Then try 'reverting' your blend file, see the screenshot above for where the revert command in blender is. This will revert your session in blender back to the last save point and res-establish a clean sync.
The next thing to try is to re-open the blend file you are working with. To do this, first make sure you've saved your latest changes, then in blender go to File > Open and make sure that if you intent to have your python scripts and drivers load and render that you check "Trusted Source" as shown below. We find that this repairs the sync in 99.9% of cases.

TROUBLESHOOTING

This section covers what to do when things inevitably go wrong (we're not being pessimistic here, in reality the current version is alpha software! Its going to misbehave at some point!). More specifically we'll deal with the following:
-
Installation and enabling
-
Connecting and synchronising a render node
-
Rendering
Installation and enabling
The known issues we have with installation have been touched on previously, but we'll repeat them here to save you a trip back to the installation section :)
Installation is done using Blender's "install from file" feature. The installation itself merely copies the contents of the CrowdRender install zip file to the correct location on your system as determined by Blender. This normally succeeds in 99.9% of cases. Where you see an issue with the install failing, note any error messages that are printed to screen.
The number one issue with failure to install is normally not removing the previous version of the file, which you must do! Blender may copy the files correctly but we've found numerous cases where a cache of the old addon is used instead. Removing the addon completely also removes this cache. This problem is hard to spot because the addon may seem to work, then fail, or might not enable properly. It is not obvious that failure to remove the original addon was the culprit.
Some confusion can also arise as to whether it is installation that has failed or enabling the addon. To be clear, installation is when you press "install from file" and tell Blender to use the CrowdRender zip file, this is installation.
Enabling the addon is when you check the checkbox next to "Crowdrender" in the list of available addons.

In the image above you can see what enable means. Once you check the check box, Blender will attempt to enable the addon. This is the first time Blender actually tries to load CrowdRender and is where many users mistake a failure to load as a failure to install. So lets cover the problems with enabling the addon.
The most common issue we see is on windows where the operating system is missing some required system files. Usually you'll see an error like this
File "C:\Users\James\AppData\Roaming\Blender Foundation\Blender\2.79\scripts\addons\crowdrender\lib\Win64\zmq\backend\cython\__init__.py", line 6, in <module> from . import (constants, error, message, context, ImportError: DLL load failed: The specified module could not be found.
As mentioned in the installation section, there is an easy fix for this. Just download and install this windows update -> https://www.microsoft.com/en-US/download/details.aspx?id=48145
The second most likely culprit for a failure to enable properly, and one that you might not recognise as failing at the enable/loading stage, is after you've had a crash or hang with the CrowdRender system. CrowdRender uses two background processes of blender to handle communications with other nodes. Its possible for one or both not to exit when blender suddenly stops working or if the CrowdRender system hangs.
Its really good practise to check before you load Blender after a problem that there aren't any background processes still alive. If there are; kill them before opening blender.
Connecting and Synchronising
Connecting to a node is perhaps the most difficult aspect of the CrowdRender system to troubleshoot as it involves the most number of variables. Any number of the following can prevent a connection from happening:
-
The render nodes you want to connect to are off, not running Blender, or CrowdRender, on fire, gone, etc
-
The render nodes you want to connect to no longer have network connections
-
The render nodes you want to connect to have firewalls blocking Blender from accepting incoming network connections
-
The render nodes you want to connect to are on a different physical network to the one you're connected to
-
The render nodes you want to connect to are running a different version of blender, CrowdRender etc
-
The render nodes you want to connect to are 'sort of' within wifi range, but not really for this to work
-
The ip address you typed in that you were sure was right proved you that you were wrong, but you won't admit it.
This is also not an exhaustive list by the way. It gives you an idea of how many things you need to check when a connection doesn't work. Typically CrowdRender will give you the following feedback, It will say "connecting" for about 30 seconds (the default network timeout) and then show that node as "Failed to Connect". This is all CrowdRender knows, it tried to contact the render node and got no response. This could be anyone of the reasons given above, or others not mentioned.
Its a good idea to use the list above as a check list when trying to figure out why you can't connect. Also notice how none of these issues has anything to do with CrowdRender have a bug. This is also a possibility, but with over a thousand people using our software successfully, its not the first thing you should check. If you find everything else checks out and you still can't get a connection, then its time to get support, which we'll gladly provide :D.
After connection, synchronising render nodes is the next hurdle to overcome! Synchronising is the process by which our addon calculates whether the master and render nodes have exactly the same scene in memory. This is critical as when you press render, you want to be sure that you will get an image which is correct with no corruption. CrowdRender has a play it safe policy in which if a render nodes is in a "sync failed" state, it won't be able to render.
Naturally you want to avoid this. We've touched on this a little in the editing section. Its important to realise that the synchronisation feature for Blender is not yet complete. Not all blend data is tracked. So it is possible to get a project to synchronise and then see renders that look wrong. Normally the way to fix this is to press the "resync" button (see below).

Pressing "Resync" will first save a copy of your project to a temporary folder, then transfer this copy and overwrite the current project on each render node.
We also mentioned that sometimes resync will not results in each node being synced. In some cases this can be fixed by first saving your project and then "reverting" which reloads the project (see below for where to access the revert tool in Blender).

SUPPORT
SUPPORT

If you get stuck and need help, there are a few ways to get help. Though we can't sit next to you and walk you through stuff, we will do our best to answer your questions. So, where do you go to ask such questions?
First you can head to our forum, here you can post questions and browse similar ones from other users. We do our best to respond promptly, but being based in Australia, we sometimes won't be awake and only see your post the next day. This is especially true for users in North America and Europe :)
Another way to reach us if you'd rather not have your question out in public (the forum is open to anyone with internet access), is to e-mail us. You can send us a msg via our contact form here (just click Contact Us).
If you're pretty sure you've found a bug and would like to report it, we've got a section on our site where you can raise a bug which will go into our software manager. You can post details of what happened, how to reproduce the problem, and your log files. You can access the bug reporting tool by clicking this link.
RELEASE NOTES

See what's changed in 0.2.x versions of the software
Release notes - Crowd Render - Version Alpha 0.2.2
** Bug
* [CR-709] - Persistent sync failures when resyncing, now you can resync and this will fix the sync fail issue.
* [CR-720] - client interface is a process that just won't quit... sometimes, this process needs to exit on restarts of blender so the system can reset if it has hung or crashed. Otherwise only a reboot of the computer or careful use of the task manager/process monitor will restore the system properly. We've fixed a bug that stopped one of these processes from exiting.
Release notes - Crowdrender Alpha - Version 0.2.1
** Bug
* [CR-704] - Glitchy behaviour in rental request loop when opening a different file or opening the default file
* [CR-705] - Updating the status of a node that hasn't been added to the user's list in the addon causes a traceback error
Release notes - Crowd Render Alpha - Version 0.2.0
Here you can find details of the changes made in this version of the software!
** Bug
* [CR-5] - We are missing a whole bunch of panels from both blender internal and cycles
* [CR-106] - Attempting to connect with no network connection causes error
* [CR-113] - A process hangs after shutdown on the client.
* [CR-120] - Sync fail when deleting an object
* [CR-126] - Gatekeeper has somehow screwed the installation of blender/crowdrender
* [CR-130] - Undo is broken!
* [CR-137] - Rendering in some cases produces errors or wrong looking renders
* [CR-150] - Loading large files causes the transfered file to be corrupt
* [CR-151] - Animatation frames are not all returned to the requesting client
* [CR-384] - Too many async tasks for the discovery request
* [CR-489] - Compute device setting stored on client interface, causes wrong device used during render...sometimes
* [CR-662] - In bl279 the pop ups for the node and cloud issues won't update when using the scroll bar or filter
* [CR-676] - Turning off the discovery server kills the host process (blender) addon.
* [CR-678] - Blender 2.81 now has a new argument for the save handlers, our code chokes on the new argument
* [CR-701] - Segfault/Access violation occuring when rendering with Crowdrender
** Task
* [CR-48] - Bad Design - duplication - Discover ip method duplicated in three modules!
* [CR-52] - Feature - enhancement - more feedback during render call
* [CR-99] - As a CR dev I need to have a save file handler so that I can set the users blend file to the correct path
* [CR-105] - Feature - enable ability to choose which frame to render
* [CR-110] - As a dev, need to ensure that loading blender with CR enabled works so users can save their blend files with it enabled
* [CR-117] - Investigate running client and server processes not from within the addon_enable operator
* [CR-118] - Disabling the addon means background processes will not quit
* [CR-551] - the possibility of setting the quantity cores
** Sub-task
* [CR-26] - Display connection status to user
* [CR-50] - Bad design - inconsistency - different calling methods used
* [CR-121] - As a dev, need to now enable multiple object duplication
* [CR-124] - Need to detect second machine disconnect or sync fail so that client can switch to single machine mode
* [CR-132] - No way to reset remote machine in sync fail condition
* [CR-168] - Display connection pending status to user
* [CR-169] - User interface doesn't update node status when rendering
* [CR-596] - Modify render.py to allow number of threads to be set
* [CR-597] - New UX to allow user to set num threads per node
** Story
* [CR-38] - As a CR dev reconfigure the networking code to handle multiple servers
* [CR-78] - As a Dev I need to support the Cycles render engine
* [CR-80] - Oh f#*k it, lets do multi nodes
* [CR-84] - As a dev I need to review and fix state management so that the system is more robust
* [CR-108] - As a developer I need to ensure an easy and hard to cockup way to install crowdrender
* [CR-200] - As a dev I want to be able to have more detail in logs that help debugging
* [CR-401] - Add logout button to addon
* [CR-536] - Allow users to set the number of CPU threads per node
* [CR-649] - Allow hybrid rendering on connected Nodes.
* [CR-650] - Create a user experience for viewing warnings, errors and info messages from render nodes
* [CR-656] - Cause all sockets that listen to bind all interfaces